Reading: None.
In this lab, you will set up your BeaglePlay single board computer (SBC) for use in this course. You will also get introduced to the development environment we will be using.
This lab looks long, but that is because it contains a lot of detailed instructions on how to get set up. Some of these instructions are not necessary for you to do because they have already been done. They are included for reference. Please read over the entire lab, but don't feel intimidated by it!
Proceed as follows:
Connect your BeaglePlay to your computer via a USB cable. Use the USB-C connector on the BeaglePlay. This both powers the BeaglePlay and provides a way for you to communicate with it. Specifically, your BeaglePlay will appear at IP address 192.168.6.2 or 192.168.7.2 or both. The precise IP address depends on your USB hardware and how Ethernet-over-USB works on your machine.
Use any SSH client on your machine to connect to the BeaglePlay at address 192.168.6.2 or 192.168.7.2 (whichever one works). You can log in as the user "debian" with the password "frenchfry". I recommend that you change your password to something only you know using the passwd command.
Note: If you just flashed your BeaglePlay from scratch, the initial password is "temppwd" and you will be prompted to change the password when you first connect to it.
Create a folder for this course using a command such as:
$ mkdir cis-2730
We will use this folder for all course-related files. Doing this makes it easier to transfer your material from the BeaglePlay for backup purposes. It also helps keep things organized.
Your BeaglePlay comes with the nginx web server and the web version of Visual Studio Code installed. Proceed as follows:
To access VS Code on your device, use a web browser on your computer and visit https://192.168.6.2:3000. Replace the "6" with a "7" if necessary in your case.
Accept the self-signed certificate.
Inside VS Code, click on the "Explorer" icon in the upper-left corner of the page (it looks like two pieces of paper on top of each other). Click on "Open Folder" and open the cis-2730 folder you just created. VS Code will ask you if you trust the authors of the files in that folder. Say "yes" (you are the only author; do you trust yourself?)
Create a new file in that folder (File > New) named blinkLED.py. Add the sample code to that file. You can copy and paste the program into VS Code, or, alternatively you could use an SSH file transfer tool (such as WinSCP) to transfer the file to your BeaglePlay over the USB connection.
In your SSH session (or, alternatively, in a VS Code terminal), change to the cis-2730 directory, if necessary, and then run the program using:
$ python blinkLED.py
You should see the third green LED flashing once per second. Use Ctrl+C to abort the program. Notice how it may (or may not) leave the LED on. Terminating the program with Ctrl+C ends it immediately, potentially leaving things in a cluttered state. There is no harm done in this instance, you just have an LED on for no reason, but this is an issue we will discuss more in the future.
In VS Code, modify the program so that each time the LED blinks, it stays on for 0.5 seconds and goes off for 2.0 seconds. Your changes are saved immediately and automatically. Re-run the program to see the change.
Your program was able to write to the LED's trigger and brightness control file. Why? Hint: check the permissions on those files. Get a list of groups the debian user is a member of by using the groups command.
When you are done, proceed as follows:
Use the exit command in the terminal window of VS Code (if it is open) to properly close that terminal session.
Close the open folder in VS Code.
Close the VS Code tab in your browser.
Use the command sudo shutdown -h now in your SSH session to shut down and halt (-h) your BeaglePlay. Once the LEDs are out on your device, you can unplug it from your computer.
This section contains some notes for reference. It does not contain any additional intructions related to the lab.
The BeaglePlay is an SBC designed for experimentation and for prototyping projects. It is produced by BeagleBoard and is one of several SBCs offered by that company.
The BeaglePlay can connect to the network using either an Ethernet cable or a wireless interface. Unfortunately, at the time of this writing, it is necessary to manually solder the (provided) wireless antenna to the board before using the wireless interface. However, for this course, you can connect your BeaglePlay to the VTSU LAN via a wired Ethernet connection. In many cases, you won't need a network connection for your BeaglePlay anyway.
Before using the BeaglePlay, you should update the system software on the board to the latest version (full details). This entails doing the following:
Download the latest boot image for the board from BeagleBoard.
Copy the image to a micro-SD card.
Boot the BeaglePlay in a special way with the micro-SD card inserted so the contents of the micro-SD card are flashed (or "burned") into the board's non-volatile storage.
The following subsections describe the details of this process.
Download the "BeaglePlay latest flasher image (XFCE)" from BeagleBoard.
The flasher image flashes itself to the BeaglePlay's internal storage. The non-flasher image runs from the SD card, which can be useful for experimenting with a new image before committing to it.
The "XFCE" in the name of the image refers to the XFCE desktop environment. If you connect your BeaglePlay to a monitor via the HDMI interface and to a keyboard and mouse via USB, you should be able to use it like a desktop system. BeagleBoard also provides a "minimal" image without the desktop environment, but we are not using that one in this class.
Proceed as follows:
Download balenaEtcher (free) and install it on your computer. There is a version for Windows, macOS, and Linux.
Plug your micro-SD card into your computer. You may need an adaptor, depending on your machine. Using balenaEtcher, copy the boot image you downloaded previously to the micro-SD card.
Proceed as follows:
Insert the micro-SD card into your BeaglePlay until the card clicks into place.
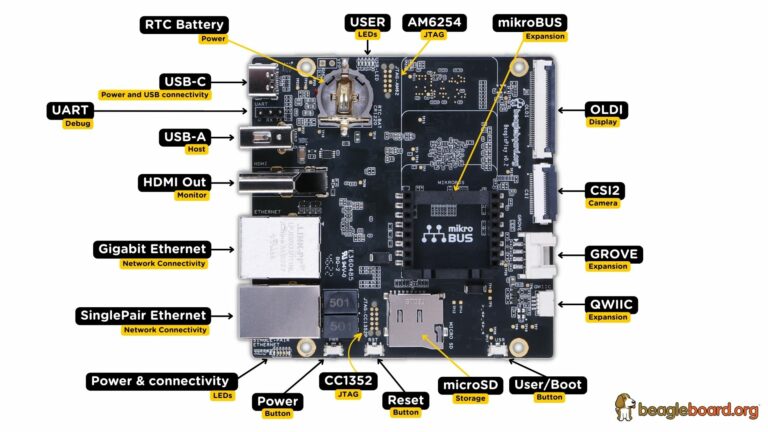
Press the USER/BOOT button and then simultaneously plug your BeaglePlay into a USB port on your computer to power and boot the device. You must hold down the USER/BOOT button while the device boots. This image shows the location of the USER/BOOT button on the board (lower right corner of the image).
The LEDs on your BeaglePlay will flash back and forth when the boot image is being copied to your device. Only when that happens, can you release the USER/BOOT button.
Wait until the LEDs stop flashing and go out. That signals that the boot image copy has been completed. It may take 15–20 minutes.
Unplug your BeaglePlay from the USB connection and remove the micro-SD card.
You have now completed the steps to update the boot image.
Now that you have the latest boot image installed, you should next update the system software beyond whatever was available at the time the boot image was made.
NOTE: It is essential to use the updating procedure provided by BeagleBoard. Do not use the standard Debian-based update commands. This is because the BeaglePlay has a custom kernel provided by BeagleBoard that has extensions allowing it to interact with the various specialized hardware on the board. If you update to a stock Debian kernel, it is likely you will break the software environment and end up with a non-functioning board.
TODO: Describe the correct update procedure!
There is nothing you need to submit for this lab. Completing the lab is worth 20 points.
Last Revised: 2025-01-17
© Copyright 2025 by Peter Chapin <peter.chapin@vermontstate.edu>